Who Dug It?

|
Throughout this year, we were able to find different people's sides to the same story. We were taught to always wonder, what is true and who owns history? So in the end, we wrote our own history so we could say, I own this history. We got to chose what historical topic we wanted to research. I chose to write about immigration because it is a part of my family. I talked to people who have experienced immigration, I read parts of two text books about immigration, I read news articles about immigration, and I watched a documentary about Cuba. After analyzing and questioning all of the sources that we found, I got to choose what to include and what not to include in my history. We also made chronologies for ourselves and other objects. We explained the evolution of how some common day items have changed over time. Continue to scroll down to see what else we made during this semester in fuller detail!
|
Self Chronology Card
|
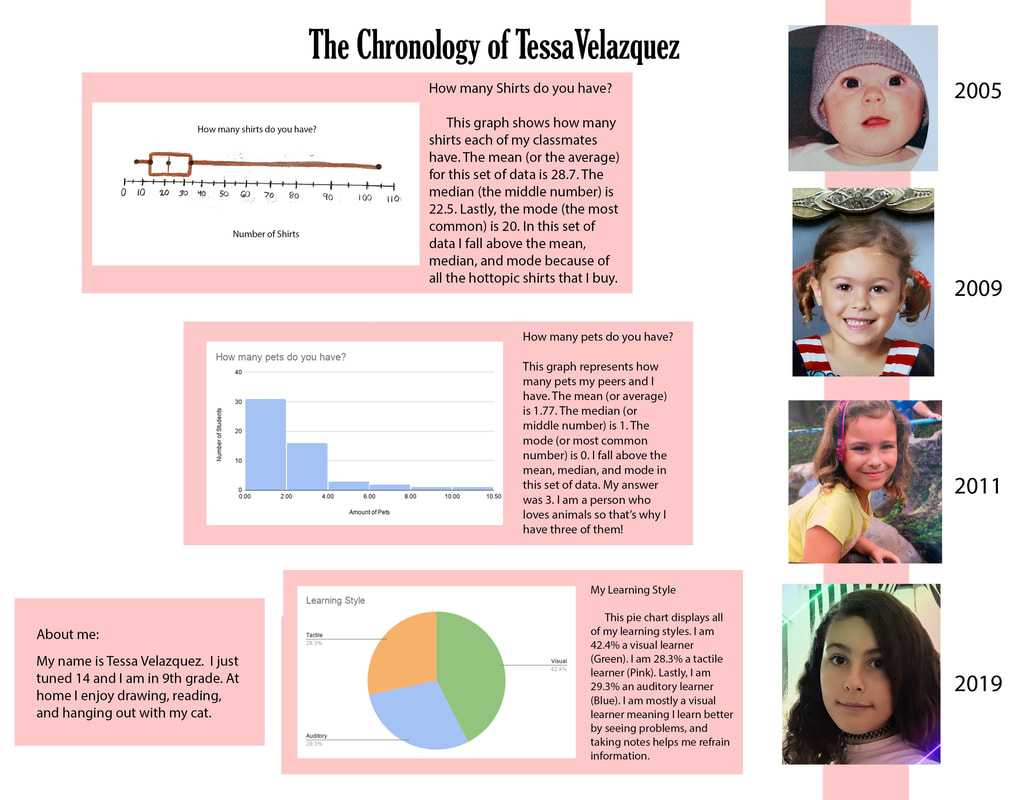
Our first project in Math class was a self chronology card. We worked individually to create a chronology of our lives. our first task was to go home and fill out a survey that asked us to count things like how many pets we have, how many shoes we have, and how many pieces of fruit we have in our kitchen. We then chose three questions that made the biggest impact on our lives and created graphs to represent them. I hand drew the box and whisker plot for extra credit (the top one). We used Photoshop to import the pictures of ourselves and type in why we chose to display these graphs.
|
Modern Chronology
|
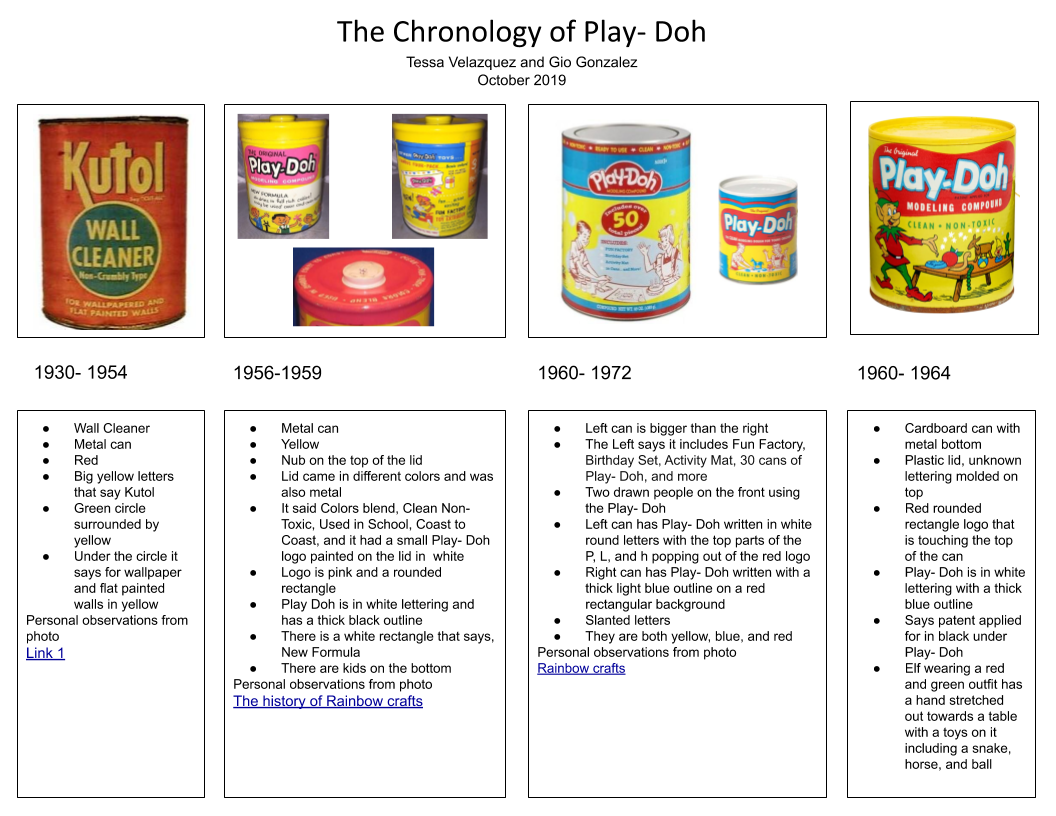
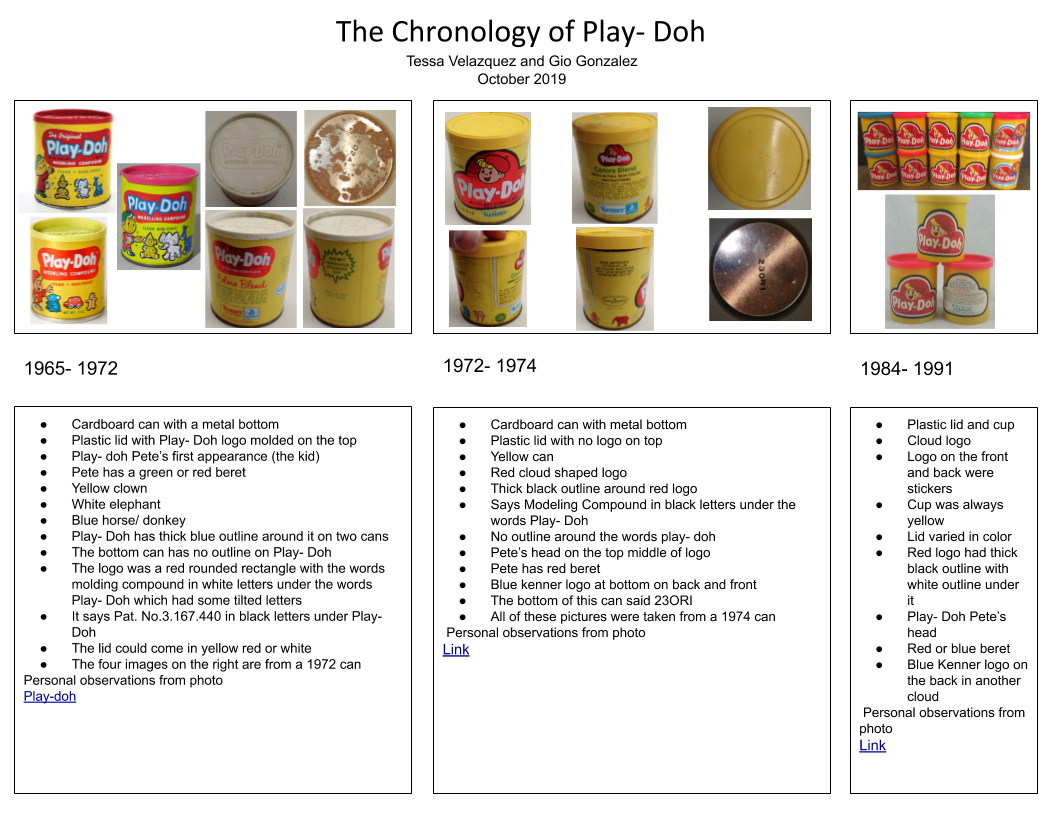
This was another chronology we made in class. We got put in partners for this project and chose our item together. My partner and I chose to research Play- Doh containers. We made these chronologies for archaeologists so if they came across a Play- Doh container in the future, they can see when it was made, and date other items around to a similar time. We learned a lot of steps when researching that included choosing the questions we needed to answer, making sure the sites we were using were trustworthy, and getting rid of unnecessary information. The last one was definitely a struggle for me. Once we had all of our information organized and we knew what we wanted to write, we put together our final product on google draws.
|
|

|
Saddle- Splosion Chronology

|
This project and the next two are all a part of the Thing- Splosion project. We got put into partners much like the last project and chose an object to research. The object my partner and I chose was the saddle. We did a lot of research and learned about ancient civilizations. We researched when the first saddle was made and what it was used for. The final product for this project was a two sided wooden plank with both of our writing on each side. My side was describing the history of the object and my partner's side explained the characteristics and what the item was used for. My side is displayed on the left. Throughout this project, I came across the struggles of working with a partner for the first time this year. I like to work really hard in school and I like everything to be neat and organized the way I like it. I learned that not everyone is the same way. I helped my partner with staying on task and the end product didn't turn out as bad as I thought it would in the beginning.
|
Saddle- Splosion

|
This was the next step to our Thing-Splosion project. We made a mini mind map drawing and wrote down everything we remembered when we researched about our object. We also made a writing piece about the civilization that created our object. I chose to write a historical piece while other people could write made up stories that were still historically correct. We then scanned our mind maps and copied and pasted our writing pieces into Photoshop. After this, we found a line art image of our object. We then made the inside of our object transparent with the magic wand tool. Lastly we added a drop down shadow to make the text look like it was popping out more!
Click here to read my Saddle-Splosion Writing Piece |
Medallion

|
We made our medallions in physics class. They had to be something that somewhat represented the item we made our chronologies about. The first step was to find a simple image of our object. The medallions were too small to put a saddle on it so we decided to make it a horse's head instead. Once we found a simple line image, we imported it into Adobe Illustrator. We fitted the shape into a square and got it all ready for laser cutting. When we got our laser cut pieces we had to glue the pieces together so we could pour the metal into the mold. When it dried, and we were ready to cast, we got all of our necessary tools. This included gloves, goggles, a cement block, a pan, pliers, water, a stirring stick, a blow torch, the mold, and about 40 pennies. Once we got all of this we headed outside to cast. One person held the blowtorch to the pennies and the other person held the pan and stirred the pennies around. When they were melted, we quickly pour the melted metal and plopped the mold into the water so it cooled off quickly. We then took the metal out and we had a finished medallion. It was tricky finding out how many pennies we needed and we had many failed attempts, but in the end we made a successful one!
|

|

|
Record Player


|
Our record player was a project that we spent a lot of time creating prototypes for. We started with a template that looked a lot like the bottom image but smaller. My group focused on trying to make the needle stay in the grooves of the CD or record better. We started with a hand cut bigger prototype, then modeled the template on Adobe Illustrator to be the same size so we could also spin records on it. I added a thin cardboard strip to the left of the needle that touched the base. It held up the needle and put less pressure on it so the needle wouldn't scratch the CD or record as easily. In the end we used the top image as our final design and everyone had one on display at exhibition.
Click here to see more pictures of this project. |
Booklet
|
The booklet was probably my favorite part of our project. Throughout the year we read and analyzed many different kinds of sources. We read news articles, history textbooks, a novel, we organized interviews, and I watched a documentary, and wrote a page on it for extra credit. After we did all of our research and write ups, we made two mini mock up designs to get a feel of what we wanted our final product to look like. After this, we jumped into Photoshop. We wrote about our project in there, quotes from our sources, what we thought about the quotes we chose, and our My History Writing piece. I chose my theme to be black and white because I wanted to make mine look really nice. I took great care to make sure that the pages lined up. I was the first one to finish and this allowed me to learn how to use a whole new program, Adobe InDesign. In this program I learned how to set up the pages of our booklet so it was ready to be printed. This ended up being my job and I made every single person's booklet ready to be printed. Definitely a tedious task, but I was really glad that I got to learn something new and help out my teachers.
The whole booklet. My History Writing Piece |
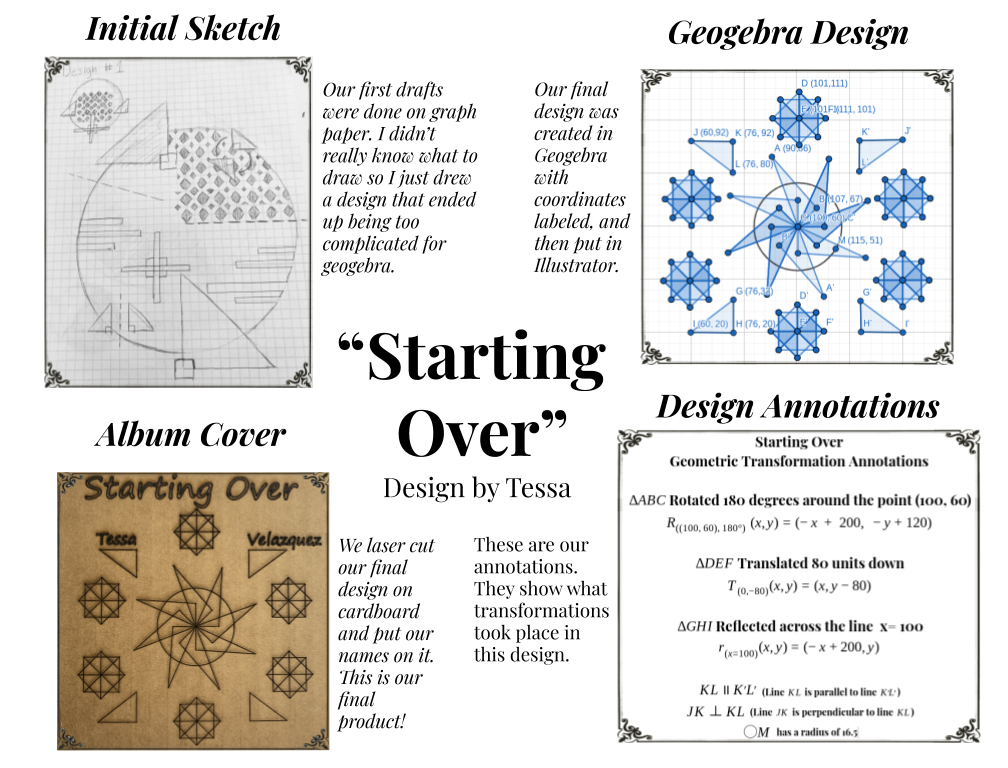
Geometric Chronology
|
This was the last chronology that we made this semester. It was a chronology of the process it took to make our geometric patterns ready to be put on our Record players. We started with our sketch that we then put into geogebra, a website that lets you make geometric patterns. Some of our geogebra designs looked like our initial sketches and other's, like mine, completely changed their design when they went into geogebra. After that we traced our image into Adobe Illustrator so it was ready to be laser printed. Our design annotations explained to people the mathematical transformations that were happening within our designs. We learned how to write out the proper annotations for translations, rotations, reflections, circles, parallel lines, and perpendicular lines.
Click here to see a bigger image of my Annotations |
